Why Motorcycle Batteries Need Charging
Motorcycle batteries are essential components that power everything from the electric starter and ignition system to the headlights, turn signals, and instrument panel. Unlike car batteries, which are continuously charged by powerful alternators during extended driving sessions, motorcycle batteries are smaller, have less capacity, and may not receive sufficient charging during short rides or periods of infrequent use. As a result, motorcycle batteries are more susceptible to discharge and may require periodic charging with an external battery charger to maintain optimal performance.
Several factors can contribute to a motorcycle battery losing its charge. Extended periods of storage, particularly during winter months when many riders park their motorcycles, is one of the most common causes of battery depletion. Parasitic electrical draws from alarm systems, clocks, or faulty wiring can slowly drain a battery even when the motorcycle is not in use. Extreme temperatures, both hot and cold, can also accelerate battery discharge and reduce overall battery life. Understanding how to properly charge your motorcycle battery is an essential skill for any rider and can save you from the frustration and expense of dead batteries and roadside breakdowns.
Types of Motorcycle Battery Chargers
Before diving into the charging process, it is important to understand the different types of battery chargers available and which one is best suited for your motorcycle battery. Choosing the right charger is crucial for safe, effective charging and for maximizing the lifespan of your battery.
Trickle chargers are simple, low-output chargers that provide a constant, low amperage current to the battery. These chargers typically deliver 1 to 2 amps and are effective for slowly bringing a depleted battery back to full charge. However, traditional trickle chargers do not have automatic shut-off features, which means they can overcharge the battery if left connected for too long. Overcharging can cause electrolyte loss, plate damage, and reduced battery life, so trickle chargers require monitoring and should be disconnected once the battery reaches full charge.
Smart chargers, also known as automatic chargers or intelligent chargers, are the most popular and recommended type for motorcycle use. These chargers use microprocessor-controlled charging algorithms that automatically adjust the charging rate based on the battery's condition and state of charge. Smart chargers typically go through multiple charging stages, including bulk charging, absorption charging, and float or maintenance mode. Once the battery reaches full charge, the smart charger automatically switches to a float mode that maintains the battery at its optimal level without overcharging, making them safe to leave connected for extended periods.
Battery tenders and maintainers are specialized smart chargers designed specifically for long-term battery maintenance during storage periods. These devices deliver very low amperage (typically 0.75 to 1.25 amps) and are designed to be left connected to the battery for weeks or months at a time, keeping it at full charge without the risk of overcharging. Battery tenders are an excellent investment for riders who store their motorcycles during winter or other extended periods of non-use.
Preparing to Charge Your Motorcycle Battery
Proper preparation is essential for safe and effective battery charging. Before connecting the charger, there are several important steps you should take to ensure everything goes smoothly and safely.
First, identify your battery type. Motorcycle batteries come in several varieties, including conventional flooded lead-acid batteries, sealed maintenance-free batteries (also called VRLA or valve-regulated lead-acid), absorbed glass mat (AGM) batteries, and lithium-ion batteries. Each type has specific charging requirements, and using the wrong charger settings can damage the battery or create safety hazards. Check your motorcycle's owner manual or the label on the battery itself to determine the battery type and recommended charging specifications.
Next, inspect the battery for any visible signs of damage, such as cracks in the case, swelling, leaking electrolyte, or corroded terminals. A damaged battery should not be charged and should be replaced. If the battery appears to be in good physical condition, clean the terminals with a wire brush or terminal cleaning tool to remove any corrosion or buildup that could interfere with the charging connection. Corroded terminals create resistance that can slow charging and produce inaccurate readings on the charger.
Decide whether to charge the battery while it is still installed in the motorcycle or to remove it for charging. Charging the battery in the motorcycle is more convenient but may present challenges in accessing the terminals and routing the charger cables. Removing the battery allows for easier access and inspection but requires disconnecting the cables (always disconnect the negative cable first) and handling the battery carefully. If your motorcycle is stored in a garage with access to an electrical outlet, leaving the battery installed and using a battery tender with a permanent pigtail connector is often the most convenient option.
Step-by-Step Charging Process
Once you have selected the appropriate charger and prepared the battery, you can proceed with the charging process. Following these steps carefully will ensure safe, effective charging and help protect your battery from damage.
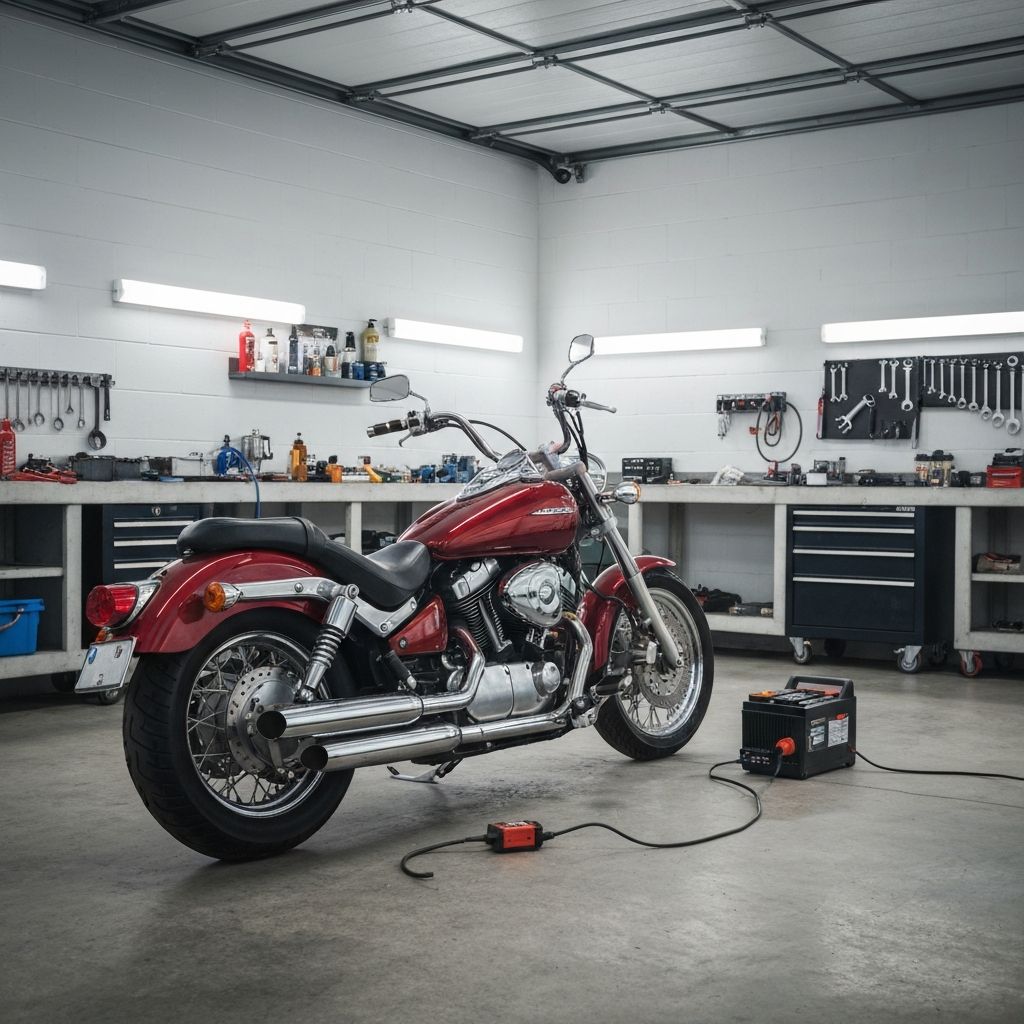
Step one is to make sure the charger is turned off and unplugged before connecting it to the battery. This prevents sparking that could occur if the charger is active when the connections are made. Connect the positive (red) charger clamp to the positive battery terminal first, then connect the negative (black) charger clamp to the negative battery terminal. Ensure the connections are secure and that the clamps are not touching each other or any metal surfaces on the motorcycle.
Step two is to set the charger to the appropriate settings for your battery type and size. Most smart chargers have selectable modes for different battery types (lead-acid, AGM, lithium, etc.) and different battery sizes. Select the mode that matches your motorcycle battery. If your charger has a selectable amperage setting, choose a lower amperage for a slower, gentler charge that is easier on the battery. A charging rate of 1 to 2 amps is ideal for most motorcycle batteries.
Step three is to plug in the charger and turn it on. The charger should begin the charging process, and most smart chargers will display the battery's current state of charge and the charging mode. Allow the charger to complete its full charging cycle without interruption. Depending on the battery's state of discharge and the charger's amperage, a full charge can take anywhere from 2 to 24 hours. A deeply discharged battery will take longer to charge than one that is only partially depleted.
Step four is to disconnect the charger once charging is complete. Turn off and unplug the charger first, then disconnect the negative (black) clamp, followed by the positive (red) clamp. If you removed the battery for charging, reinstall it in the motorcycle, connecting the positive cable first and the negative cable last. Ensure all connections are tight and secure before starting the motorcycle.
Safety Precautions
Charging a motorcycle battery involves working with electrical current and potentially hazardous chemicals, so it is important to observe proper safety precautions throughout the process. Lead-acid batteries produce hydrogen gas during charging, which is highly flammable and can be explosive in confined spaces. Always charge batteries in a well-ventilated area, away from open flames, sparks, and heat sources. Never smoke near a charging battery.
Wear safety glasses and chemical-resistant gloves when handling batteries, especially conventional flooded batteries that contain liquid sulfuric acid electrolyte. If electrolyte comes into contact with your skin or eyes, flush the affected area with large amounts of clean water and seek medical attention if irritation persists. Keep a box of baking soda nearby when working with batteries, as it can be used to neutralize acid spills.
Never charge a frozen battery, as this can cause the case to crack and the electrolyte to leak. If you suspect your battery has frozen (common in extremely cold weather), allow it to thaw completely at room temperature before attempting to charge it. Never attempt to jump-start or rapidly charge a severely depleted battery, as this can cause overheating, gassing, and potentially an explosion.
Maintaining Your Battery for Maximum Life
Proper maintenance is the key to maximizing the lifespan of your motorcycle battery and minimizing the need for emergency charging. Regularly riding your motorcycle is the best way to keep the battery charged, as the motorcycle's charging system replenishes the battery during operation. Aim for at least a 20 to 30 minute ride at highway speeds each week to maintain a healthy charge level.
During extended storage periods, connect a battery tender or maintainer to keep the battery at optimal charge. Store your motorcycle in a cool, dry location, as extreme temperatures accelerate battery degradation. If storing the motorcycle for more than a month without a tender, consider removing the battery and storing it indoors in a cool, dry place, checking and charging it monthly.
Keep the battery terminals clean and free of corrosion by periodically inspecting them and cleaning with a wire brush or terminal cleaner. Apply a thin coat of dielectric grease or anti-corrosion spray to the terminals after cleaning to prevent future corrosion buildup. For conventional flooded batteries, check the electrolyte level regularly and top off with distilled water as needed, being careful not to overfill.
By following these charging and maintenance practices, you can expect your motorcycle battery to provide reliable performance for three to five years or more, keeping you on the road and ready to ride whenever the mood strikes.
