Why Customize Your PS4 Controller?
The PlayStation 4 DualShock 4 controller is one of the most widely used gaming controllers in the world. While Sony's default design is functional and comfortable, many gamers seek to personalize their controllers to reflect their individual style, improve comfort and ergonomics, or gain a competitive edge. Customizing a PS4 controller allows you to create a gaming accessory that is uniquely yours, whether through aesthetic modifications like custom paint jobs and colored buttons or functional upgrades like improved thumbstick grips and back paddles.
The custom controller market has exploded in popularity over the past several years, with both DIY enthusiasts and professional customization services offering a wide range of options. From simple skin wraps that can be applied in minutes to complete teardown rebuilds with aftermarket components, the possibilities for personalizing your PS4 controller are virtually limitless. Whether you are a casual gamer looking for a unique look or a competitive player seeking performance enhancements, there is a customization option that fits your needs and budget.
Getting Started: Tools and Materials You Need
Before you begin customizing your PS4 controller, you will need to gather some essential tools and materials. The specific items required will depend on the type of customization you plan to do, but there are some basics that every customization project will need. A small Phillips head screwdriver (size PH00 or PH0) is essential for opening the controller. A plastic pry tool or spudger will help you separate the shell halves without causing damage. Tweezers can be helpful for handling small components like springs and buttons.
If you plan to paint your controller, you will need fine-grit sandpaper (400 to 600 grit), plastic primer, your chosen spray paint color, a clear coat for protection, and masking tape. For button and thumbstick replacements, aftermarket components are widely available from retailers specializing in controller modifications. These components come in a vast array of colors, materials, and styles to suit any preference.
It is important to note that opening your PS4 controller will void its warranty with Sony. If your controller is still under warranty and you are concerned about potential issues, you may want to wait until the warranty period has expired before attempting any modifications that require disassembly. For non-invasive modifications like skins and stick caps, the warranty is generally not affected.
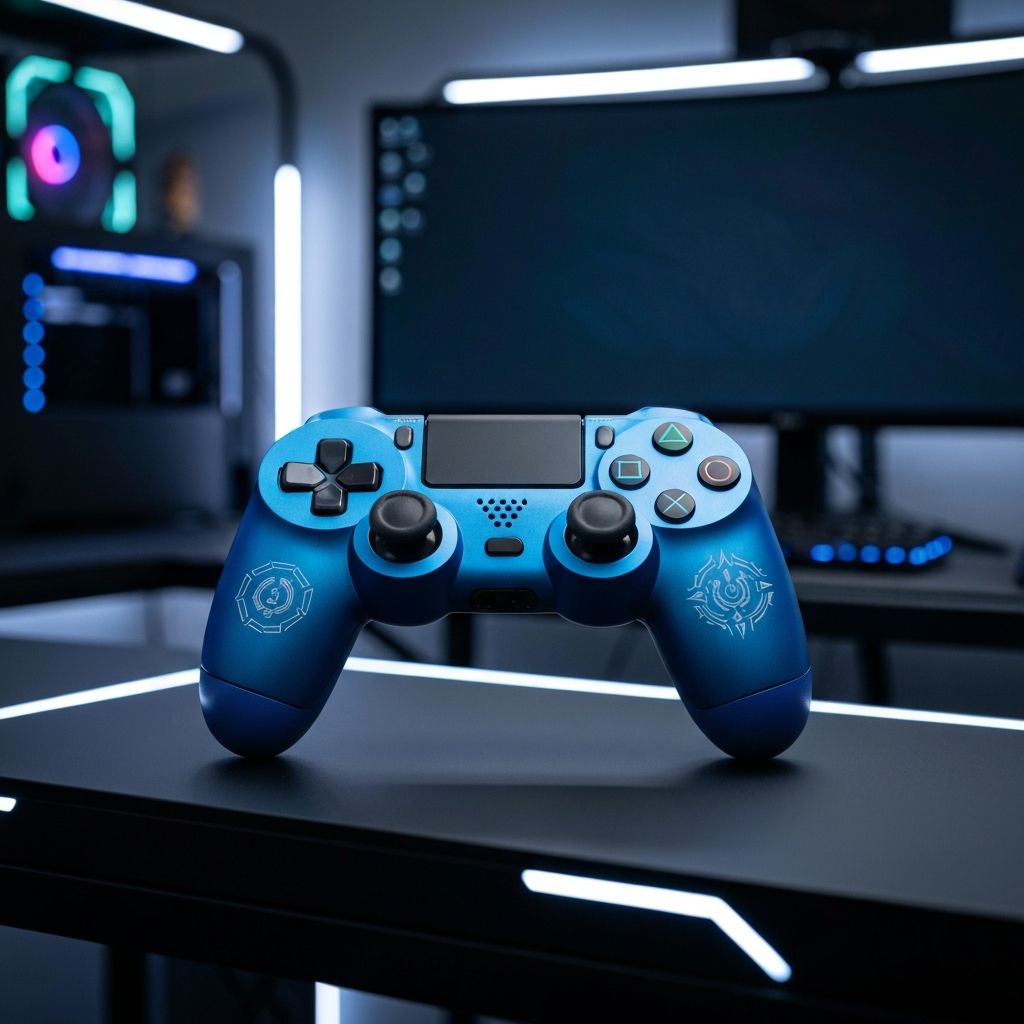
Cosmetic Customization: Shells and Faceplates
One of the most popular and impactful customizations is replacing the controller's shell or faceplate. Aftermarket shells are available in a tremendous variety of colors, patterns, and materials, including transparent, metallic, matte, glossy, carbon fiber textured, and even hydro-dipped designs featuring custom artwork or camouflage patterns.
To replace the shell, you will need to carefully disassemble the controller by removing the four screws on the back of the controller. After removing the screws, gently pry the two halves apart, starting from the bottom near the triggers and working your way up. Be careful not to pull the halves apart too quickly, as the ribbon cable connecting the touchpad is fragile and can be easily damaged.
Once the controller is open, carefully transfer all internal components, including the circuit board, battery, motors, buttons, and rubber contact pads, to the new shell. Take photos during disassembly to help you remember the correct placement of each component. Reassembly is the reverse of disassembly, and you should test the controller thoroughly before securing all screws to ensure everything is functioning properly.
Custom Buttons and Thumbstick Modifications
Replacing the stock buttons with custom alternatives is another popular modification that can dramatically change the look and feel of your controller. Aftermarket buttons are available in numerous colors and materials, including metallic aluminum, chrome, transparent, and even bullet-shaped designs for the action buttons. D-pad replacements range from the standard cross shape to faceted or dished designs that some players find more comfortable and precise.
Thumbstick modifications are among the most common controller customizations and are available in two main categories: replacement sticks and stick caps. Replacement thumbsticks require disassembly and involve swapping the entire stick module, which allows you to change the height, shape, and material of the stick. Taller thumbsticks can provide increased precision and range of motion, which is particularly beneficial for games that require fine aiming, such as first-person shooters.
Stick caps, also known as thumb grips, are the easiest modification to make as they simply fit over the existing thumbsticks without any disassembly required. They come in various textures and heights and can improve grip and comfort during extended gaming sessions. Popular brands like KontrolFreek offer a range of stick cap options designed for different gaming genres and preferences.
Performance Modifications: Triggers and Paddles
For competitive gamers, performance modifications can provide a tangible advantage. Trigger stops are one of the most popular performance mods, reducing the travel distance of the L2 and R2 triggers so that they activate with less movement. This can be critical in fast-paced games where milliseconds matter, such as competitive shooters. Trigger stops can be installed as aftermarket components or created with simple DIY methods using small screws or foam inserts.
Back paddles or back buttons are another performance modification that has gained significant popularity. These additional buttons are mounted on the back of the controller, where your fingers naturally rest, and can be mapped to any button function. This allows you to perform actions like jumping, crouching, or reloading without taking your thumbs off the thumbsticks, maintaining your aim while executing other commands. Sony even released an official Back Button Attachment for the DualShock 4, though aftermarket options with more paddles and features are also available.
Some advanced customization kits include modifiable click resistance for the thumbsticks and triggers, allowing you to adjust the tactile feedback to your personal preference. These modifications can make the controller feel more responsive and tailored to your playing style, though they require more advanced technical skills to install properly.
Painting Your PS4 Controller
Custom painting a PS4 controller is one of the most rewarding ways to create a truly unique look. However, it requires patience, preparation, and attention to detail to achieve a professional-quality finish. Start by fully disassembling the controller and removing all internal components from the shell pieces you plan to paint.
Prepare the shell surfaces by lightly sanding them with 400-grit sandpaper to create a surface that the paint can adhere to. Clean the sanded surfaces thoroughly with isopropyl alcohol to remove all dust and oils. Apply a plastic-compatible primer in thin, even coats, allowing each coat to dry completely before applying the next.
Once the primer is dry, apply your chosen paint color in multiple thin coats. Thin coats are essential for avoiding drips and runs and for achieving an even, smooth finish. Allow adequate drying time between coats as specified by the paint manufacturer. After the final color coat has dried, apply two to three coats of clear coat to protect the paint and give it a durable, professional-looking finish.
For more advanced designs, you can use masking tape to create patterns, stencils for logos or shapes, or even attempt a hydro-dip using hydrographic film. These techniques require practice and patience but can produce stunning results that are truly one of a kind.
LED and Light Bar Modifications
The PS4 controller features a light bar on the front that changes color to indicate the player number or in-game events. Customizing this light bar is another popular modification that can enhance the visual appeal of your controller. Light bar decals are the simplest option, offering themed stickers that sit over the light bar and project a colored pattern onto nearby surfaces.
More advanced LED modifications involve replacing the stock LED with a different color or adding additional LEDs inside the controller to illuminate transparent shell components. These modifications require soldering skills and a basic understanding of electronics, so they are recommended for more experienced modifiers. Custom LED kits are available from specialty retailers and typically include everything you need for the installation.
Professional Customization Services
If you prefer not to do the work yourself, numerous professional customization services offer pre-built custom controllers with a wide range of options. Companies like Scuf Gaming, Aim Controllers, and Battle Beaver Customs specialize in building high-quality custom controllers with professional-grade paint jobs, performance modifications, and premium materials. While these services can be significantly more expensive than DIY customization, they offer the advantage of expert craftsmanship and often include warranties on their work.
When choosing a professional customization service, research reviews and reputation, compare pricing and available options, and check the warranty and return policies before placing your order. A reputable customizer will use high-quality materials, provide clear communication throughout the process, and stand behind their work with a satisfaction guarantee.
Maintaining Your Custom Controller
After investing time and effort into customizing your PS4 controller, proper maintenance will help ensure it stays looking and performing its best. Clean your controller regularly with a soft, slightly damp cloth and avoid using harsh chemicals that could damage paint or custom finishes. For thumbstick grips, regular cleaning will help maintain their texture and prevent buildup that can make them slippery over time.
If you have a painted controller, handle it with clean hands and avoid eating or drinking while gaming to prevent stains and damage to the finish. Store the controller in a case or protective pouch when not in use to prevent scratches and dust accumulation. With proper care, a well-customized PS4 controller can provide years of personalized gaming enjoyment.
