The Magic of Bag Ice Cream
Making ice cream in a bag is one of the most satisfying kitchen experiments you can do at home. It requires no special equipment, takes only about 10 minutes of active effort, and produces genuinely delicious ice cream that rivals anything you can make with an expensive ice cream maker. This technique has been a favorite activity for families, classrooms, summer camps, and science fairs for decades, and it remains just as exciting and rewarding today as it ever was.
The concept is beautifully simple. You combine cream, sugar, and flavoring in a small resealable plastic bag, then place that bag inside a larger bag filled with ice and rock salt. By shaking, massaging, and agitating the bags for about five to ten minutes, the cream mixture freezes into smooth, creamy ice cream right before your eyes. The result is a single serving of fresh, customizable ice cream made entirely from scratch with ingredients you probably already have in your kitchen.
Beyond being a fun activity, making ice cream in a bag is a genuine science lesson in action. It demonstrates principles of thermodynamics, freezing point depression, and phase changes in a hands-on, delicious way. Whether you are a parent looking for a rainy day activity, a teacher planning a science demonstration, or simply someone who wants fresh ice cream without investing in an ice cream maker, this method delivers on every front.
What You Will Need
One of the best things about bag ice cream is how few ingredients and supplies you need. The list is short, affordable, and easily found at any grocery store. Here is everything you need to make one serving of classic vanilla ice cream in a bag.
For the ice cream mixture, you will need one cup of half-and-half or heavy cream. Half-and-half produces a lighter ice cream, while heavy cream yields a richer, more indulgent result. You will also need two tablespoons of granulated sugar to sweeten the mixture and one-half teaspoon of pure vanilla extract for flavor. These three ingredients form the base of your ice cream, and you can adjust the sugar and vanilla to taste.
For the freezing mechanism, you will need three cups of ice (crushed ice works fastest, but cubes are fine) and one-third cup of rock salt or kosher salt. The salt is the critical ingredient that makes this whole process work, as we will explain in the science section. You can use regular table salt in a pinch, but rock salt or kosher salt provides better results.
For equipment, you need one quart-sized resealable freezer bag and one gallon-sized resealable freezer bag. Make sure both bags are the freezer-weight variety, as thinner sandwich bags are more likely to leak or tear during the shaking process. You will also want a pair of gloves, oven mitts, or a towel to protect your hands from the extreme cold of the ice and salt mixture, which can reach temperatures well below zero degrees Fahrenheit.
Step-by-Step Instructions
Making ice cream in a bag is a straightforward process, but following these steps carefully will ensure you get the smoothest, creamiest results possible every time.
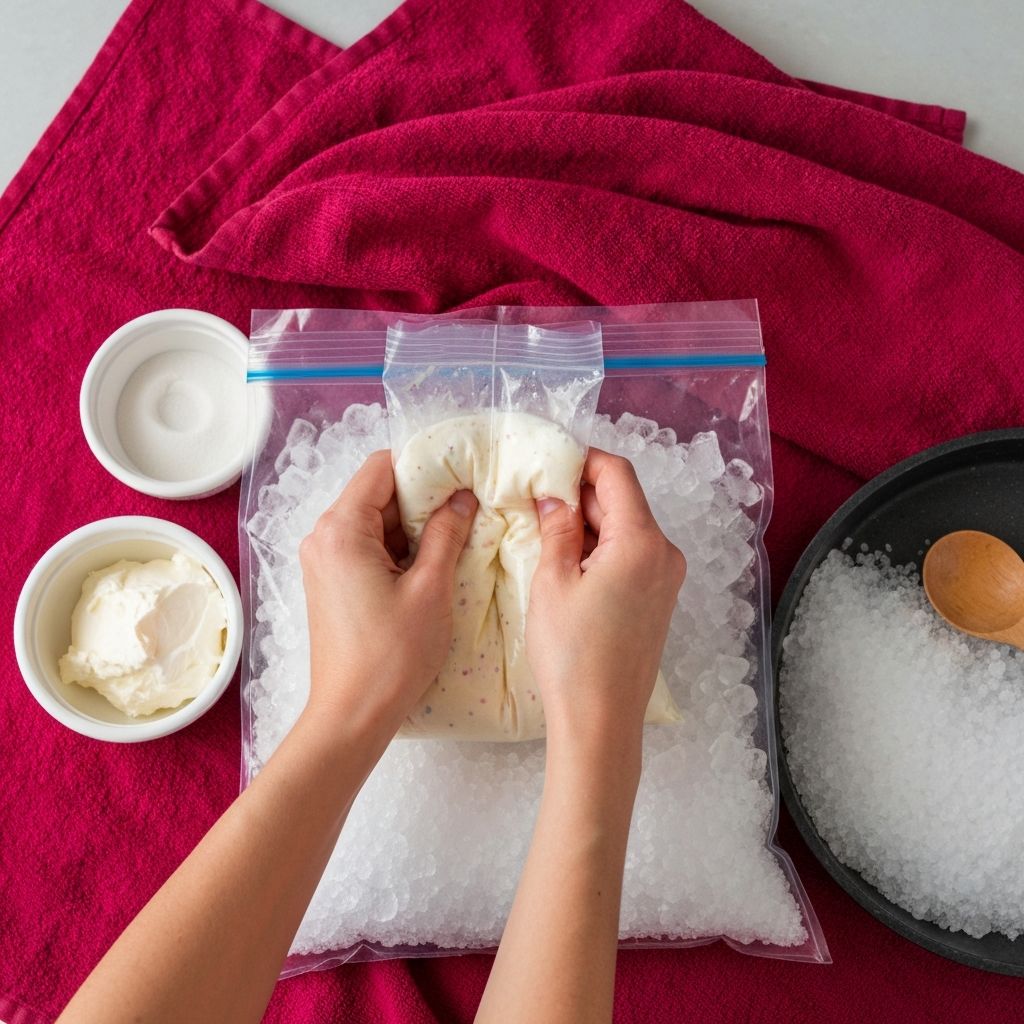
Step 1: Prepare the ice cream mixture. Pour one cup of half-and-half or heavy cream into the quart-sized freezer bag. Add two tablespoons of sugar and one-half teaspoon of vanilla extract. Squeeze out as much air as possible from the bag before sealing it tightly. Double-check the seal by gently pressing on the bag to make sure no liquid leaks out. For extra insurance against leaks, you can double-bag the mixture by placing the sealed quart bag inside a second quart bag.
Step 2: Prepare the ice bath. Place three cups of ice into the gallon-sized freezer bag. Sprinkle one-third cup of rock salt evenly over the ice. The salt will begin to melt the ice almost immediately, which is exactly what you want.
Step 3: Combine the bags. Place the sealed quart bag containing your ice cream mixture directly on top of the ice and salt in the gallon bag. Arrange the ice around the smaller bag so that the cream mixture is surrounded by ice on all sides as much as possible. Squeeze out excess air from the gallon bag and seal it securely.
Step 4: Shake it up. Put on gloves or wrap the bag in a towel, then shake, massage, and knead the bag vigorously for five to ten minutes. You want to keep the cream mixture in constant contact with the cold ice, turning and flipping the bag frequently. You will feel the mixture gradually change from liquid to slushy to a soft solid as the ice cream forms. The process typically takes about five minutes with crushed ice and closer to ten minutes with ice cubes.
Step 5: Check and serve. After five to ten minutes of shaking, open the gallon bag and carefully remove the quart bag. Rinse the outside of the quart bag briefly under cold water to remove any salt residue so it does not get into your ice cream. Open the bag, grab a spoon, and enjoy your fresh homemade ice cream directly from the bag, or squeeze it into a bowl for a more refined presentation.
The Science Behind Bag Ice Cream
The science that makes bag ice cream work is fascinating and centers on a principle called freezing point depression. Under normal conditions, water freezes at 32 degrees Fahrenheit or zero degrees Celsius. However, when you add salt to ice, it lowers the freezing point of the water, causing the ice to melt at a temperature well below 32 degrees. This might seem counterintuitive, but the melting process is actually what makes your ice cream freeze.
When salt dissolves on the surface of ice, it disrupts the equilibrium between the solid ice and liquid water. The salt molecules interfere with the ability of water molecules to form the orderly crystal structure of ice, meaning the water needs to be even colder to remain frozen. As a result, the ice begins to melt, but the melting process is endothermic, meaning it absorbs heat energy from its surroundings. That surrounding environment includes your bag of cream mixture.
As heat is drawn out of the cream mixture and into the melting ice, the temperature of the cream drops below its own freezing point, causing it to solidify into ice cream. Rock salt can lower the temperature of the ice bath to approximately minus 6 degrees Fahrenheit or minus 21 degrees Celsius, which is more than cold enough to freeze cream quickly. The rapid freezing is actually beneficial because it produces smaller ice crystals, resulting in a smoother, creamier texture.
The shaking serves an important purpose beyond just mixing the ingredients. Agitating the cream while it freezes prevents large ice crystals from forming and incorporates small amounts of air into the mixture. This is essentially the same thing an ice cream maker does with its rotating paddle or dasher. Without agitation, the cream would freeze into a solid, icy block rather than the smooth, scoopable texture we associate with good ice cream.
Flavor Variations to Try
Once you have mastered the basic vanilla recipe, the possibilities for customization are virtually endless. Here are some popular flavor variations that work beautifully with the bag method.
Chocolate ice cream is easy to achieve by adding two tablespoons of chocolate syrup or one tablespoon of unsweetened cocoa powder to the cream mixture before sealing the bag. If using cocoa powder, you may want to increase the sugar by one tablespoon to offset the bitterness.
Strawberry ice cream can be made by mashing three or four fresh strawberries and adding them to the cream mixture along with a few drops of lemon juice to brighten the flavor. For a smoother texture, blend the strawberries first or use two tablespoons of strawberry jam.
Cookies and cream is a crowd favorite. Crush two or three sandwich cookies into small pieces and add them to the cream mixture. The cookies will soften slightly during the freezing process, creating those classic cookies and cream chunks throughout the ice cream.
Mint chocolate chip works perfectly with the bag method. Replace the vanilla extract with one-quarter teaspoon of peppermint extract and add a tablespoon of mini chocolate chips. Be careful not to overdo the peppermint extract, as it is much more potent than vanilla. Add a tiny drop of green food coloring if you want the classic mint green color.
Salted caramel is another excellent variation. Drizzle one tablespoon of caramel sauce into the cream mixture and add a small pinch of flaky sea salt. The salt in the caramel complements the sweetness beautifully, and the caramel creates lovely swirls throughout the frozen ice cream.
Tips for the Best Results
While the bag method is forgiving and hard to mess up completely, a few tips will help you achieve the best possible ice cream every time.
Use the freshest, highest-quality dairy you can find. Since there are so few ingredients, the quality of each one matters enormously. Premium heavy cream produces noticeably richer, smoother ice cream than standard half-and-half.
Make sure your bags are truly sealed before you start shaking. A leaking bag means salt water contaminating your ice cream, which ruins the flavor instantly. The double-bag technique mentioned earlier is highly recommended, especially for first-time makers.
Do not skimp on the salt. It might seem like a lot, but one-third cup of rock salt is necessary to lower the temperature enough for proper freezing. Too little salt results in a slushy mixture that never fully sets.
Keep shaking consistently. It is tempting to take breaks, but stopping allows large ice crystals to form, which results in a grainy texture. Continuous agitation for the full five to ten minutes produces the smoothest results.
Eat the ice cream immediately after making it. Because bag ice cream does not contain the stabilizers found in commercial products, it melts quickly at room temperature. Serve it right away for the best texture and flavor experience.
